Tutorial
Updated
How To: Upgrading / Rebuilding Wii U Internal Memory (MLC)
Warning
This tutorial is only for advanced users and has a serious risk of bricking the console. Make sure you read it completely before executing any step and that you understand every step and its implications. With de_Fuse everything should be unbrickable if you know how.
You should at least have a backup of SLC and SLCCMPT, as we can’t rebuild them at the moment. (can be done in minute_minute, so there is no excuse). We had two cases where the SLC corrupted for an unknown reason, so a backup is essential.
What is this for?
This tutorial goes into rebuilding the MLC from scratch on a clean media. This can become useful, if
- the MLC (eMMC) chip died or corrupted the filesystem
- the SCFM (SLC cache for MLC) became inconsistent
- you want to upgrade the capacity of the internal storage.
- you want to set up a redNAND without SCFM
If the LED is blinking blue, you have a SLC problem and not a MLC problem, so this tutorial won't help with that.
It will format your MLC, so all data on the internal Wii U memory will be lost.
Update
13.03.2024 - The wafel_setup_mlc.ipx now uses a built in IOSU function to create system folders, that should make sure the permissions are right, which caused problems with game updates in the past. It will also recreate the update folder (so system updates won't be blocked by that)
Prerequisites
- Have either ISFShax installed: https://gbatemp.net/threads/how-to-set-up-isfshax.642258/#post-10280366
OR de_Fuse 0.7.1 (or later): https://github.com/shinyquagsire23/wii_u_modchip/releases
Defuse requires some soldering, so ISFShax is probably right for you (if you can still launch the installer). - A 5.5.x firmware is expected and the only configuration tested. It might work on older firmwares or might be adoptable to those, but it will require special care.
Backing up save games
Do a backup of what you want to preserve, like savegames and Miis.
For Backing up Save games, it is recommended to use SaveMii. That requires that you have Tiramisu or Aroma running.
You can also move your savgames (or whole games) to USB, which should still be readable. When recreating the users after the rebuild, you just have to be carefull to create the users in the right order, to make the ID’s match. A backup by other means (Like savemii) is still recommended.
If you are using this tutorial to fix a failing eMMC you might not be able to use the other Backup options. In that case use the Dump MLC option in the Recovery. You can extract your data from there using wfs-extract.
Storage Options
The Wii U has two ways of connecting internal memory, each with its own drawbacks:
- SDIO – On retail consoles the internal memory is a eMMC chip connected through an internal SDIO bus to the Latte chip. This SDIO bus can also use SD cards (hence the name SD IO). Access to media connected on the SDIO is cached through a file on the SLC, presumably to reduce writes on the MLC. This cache is called SCFM and it is the reason why you always need to backup / restore SLC and MLC together and doesn’t allow easy swapping of multiple SDs.
IOSU also only supports 3 sizes of media on this bus: <=8GB, 32GB and 64GB. The size will be limited to the biggest it fits, the rest is unusable. This bus is limited to 26MB/s (4bit@52Mhz). For replacing the eMMC with an micro SD you can use MLC2SD or a similar Interposer. Soldering and micro SD adapter using wires, works too.
It is recommended to use a 64GB Sandisk Max Endurance card (But similar card should also be fine), since the Wii U is known for writing much.
- SATA – The Disc drive is connected through SATA, the connectors are different but the electrical signals are still the same. Some Kiosk consoles used this Interface to connect to a HDD. The type of the SATA device can be configured in the SEEPROM, so we can configure our retail consoles to also use a SATA HDD / SSD.
NOTE: @QuarkTheAwesome is building an SATA adapter for that purpose, available soon™.
The advantage of using this interface is, that the size isn’t limited (well WFS is limited to 2TB) and it doesn’t use SCFM, which makes some things easier and improves performance in some circumstances. The obvious disadvantage is that you can’t use your disc drive anymore. Without the Disc Drive vWii System Menu doesn't work. vWii Injectes / Wii VC from the eShop can still be used, but only when installed to USB. Also you still might need to disable the MLC on the SDIO bus, or else the wii u might still use the SDIO one if the SATA device takes too long to init.
- redNAND – redirects the read / writes to one or more of the internal storage devices to paritions on the SD card. You can create an arbitrary size MLC partition on the SD card and set it up using this tutorial. SCFM can be easily disabled for the redNAND. The 64GB limit does not exist for redNAND if the SCFM is disabled. For redNAND we have a dedicated Tutorial here: https://gbatemp.net/threads/fixing-...-soldering-using-rednand-with-isfshax.642268/
Does that mean we can’t get more than 64GB on the SDIO bus? No, BUT it requires ISFShax / defuse to boot the console every time. @GaryOderNichts created a patch to remove the limits and always use the maximum size of the SDIO media and it also disables SCFM, because SCFM doesn’t work with more than 64GB and disabling SCFM improves performance and reduces wear on the SLC, at the cost of increasing wear of the MLC media. I packaged this patch in wafel_unlimit_mlc.
Rebuilding the MLC
Now that you decided what media you want to use as MLC, we can start with the actual process:
- Download all the mlc system titles for your region from NUS. This can be done conveniently with MLCRestorerDownloader by @Xpl0itU. Copy the
otp.binfrom the SD to the folder with the MLCRestorer Downloader so it can get the common key from there.
You will get theoutput/MLC/{region}directory, which then contains a directory for each title. In total there should be 52 titles totaling ~1.1GiB.
If your console has an old firmware it might also be necessary to get the latest SLC titles.
- On the root of your SD card (the one that will go in the front slot, not the MLC replacement) create a folder wafel_install. Then copy all 52 titles to the wafel_install folder, so it now contains the 52 subfolders, one for each title. If you want to reinstall / update SLC titles, you would also put them there.
- Attach your MLC media of choice. (If you are using SATA got to
Backup and Restore, then atSet SATA Device in SEEPROMselectGEN2-HDD (Kiosk CAT-I with HDD)).
For installing MLC2SD look here: https://gbatemp.net/threads/using-n...emmc-fix-160-0103-system-memory-error.636361/ at the Soldering section.
- If you install to eMMC / MLC2SD, got to
Backup and Restoreand selectErase MLCandDelete scfm.img. If the Erase MLC fails, you can ignore that if it wasn't formatted as MLC before (from a failed install or so).
- Put the wafel_setup_mlc.ipx on the SD card in
/wiiu/ios_plugins. If you want more than 64GB on SDIO you also need to put the wafel_unlimit_mlc.ipx there. If you install withwafel_unlimit_mlc.ipx, it will be permanently required and therefore also permanently requires ISFShax or defuse.
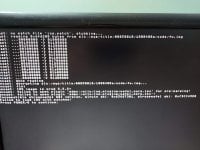
- [Optional, only when using defuse] Open the serial monitor on the PC (Putty / minicom) for defuse to see the setup progress. There will be no display output in the Wii U itself. I attached the whole serial log of a successfull install as a reference.
- Select
Patch (sd) and boot IOS (slc)in minute to start the setup of your fresh MLC.During the setup you won't see anything on the screen. You have to go by the power led.
The power LED will flash blue, while it is installing the titles.
if something goes wrong the LED will turn orange, but it will continue as long as it is blinking.
The LED will become static once it finished. You can now power off the console.
If the led is blinking red, something fatal happend. Ask for help.
During the setup a short log gets written to the SD:wafel_setup_mlc.log.
In the end it will enable the initial setup on the next boot.
- Remove the
wafel_setup_mlc.ipxfrom/wiiu/ios_pluginson the SD.
- Boot the console.
Patch (sd) and boot IOS (slc)
- If everything worked, the initial setup should launch.
ISFShax only: Finalizing
If you are using the
wafel_unlimit_mlc.ipx you need to keep ISFShax installed. If you haven't done already complete the "Booting without SD" step form the ISFShax tutorial but also add the wafel_unlimit_mlc.ipx renamed to 9unlimit.ipx to the /storage_slc/sys/hax/ios_plugins directory.If you are not using the
wafel_unlimit_mlc.ipx you can either uninstall ISFShax or keep it as a brick protection. If you keep it complete the "Booting without SD" step form the ISFShax tutorial.The Wii U should now boot automatically if you don't have an SD in.
You probably also want to enable the autobooting now.
See Also
https://gbatemp.net/threads/wii-u-internal-storage-upgrades-are-possible.635629/
Pictures
512 GB SD card:
@QuarkTheAwesome 120 GB SSD:
Thanks
- @GaryOderNichts for IOSU patches and code I took from the recovery
- @shinyquagsire23 for defuse, minute and stroopwafel
- @QuarkTheAwesome for IOSU format patch and SATA Adapter
- @V10lator for implementing Quota support and some improvements
- @Xpl0itU for MLCRestorerDownloader
- @Lazr1026 for testing and some fixes
Attachments
Last edited by SDIO,