

Tutorial
Updated
Deleting failed/incomplete game (DLC, update, etc) installs from the NAND/USB device
PART OF THIS TUTORIAL REQUIRES NAND ACCESS, DO NOT TOUCH ANYTHING WHICH YOU ARE NOT INSTRUCTED TO. I AM NOT RESPONSIBLE FOR YOUR BRICKED CONSOLE.
So please, follow directions carefully. Before starting, I'd like to greatly thank the GBA Temp user godreborn (along with all other users who provided useful information) for initially helping me through this problem, as at the time there was little-to-no information about it, at least that was easily discover-able. This tutorial is based upon the thread which he assisted me in here, back in late 2017.
Even though this isn't an extremely prevalent issue, and one could follow the initial thread I made awhile back. I thought it'd be worthwhile to gather up the scattered answers within that thread and convert it into a proper tutorial format for future Wii U homebrew users to follow, during their early/learning phases. As installing games, DLC, and official/unofficial VC titles is one of the most popular things to do.
As pointed out in the replies section by Cylent1, before deciding to go through with this process, it is worthwhile to try the option the Wii U's built in data management menu prompts you with when/if it recognizes that there is an unfinished installation.Every time I have a failed install, I just go into system settings and to data management, and it automatically recognizes the incomplete installs and erases them every time.
If this could save someone from a bricked console, then it's worth to try this way first
Overview:
Hi, this tutorial will walk you through the steps necessary to delete a game (update, DLC, etc.) which failed to fully install to the system NAND or connected USB storage device, using FTPiiU Everywhere. Depending on the size of the game, the amount of additional times you attempt the installation or how much of the installation was completed before the install failed, the reduced storage space may go unnoticed for awhile. If this occurred multiple times though, you probably realized the bar indicating used space increased (or, an increase in OS load times, a side effect of having a close to full NAND). If you recognized something was off, you probably browsed through data manager and looked for the culprit. You'll soon discover however, incomplete installs of such content will not be properly indexed by the normal data manager under system settings, making them absent from the list, and hence being unable to delete them this way.
Why and when would this occur you may ask?
- You used tools such as WUP installer GX2, the y-mod variant (or similar tools), which can't identify currently available space on your storage medium and underestimated the size of a game (
thanks NSMBU + NSLU bonus videos).
- You turned off your console, or unplugged your USB storage device while content was installing. Once you initiate a game install, there is no mechanism provided to stop it.
- You encountered some generic, unexplainable error. Forcing you to halt the install and try again, leaving leftover garbage data.
If you've only ever used the eShop for game installations this should never happen, but of course there may be circumstance which I'm unaware of.
Prerequisites:
- For FTPiiU Everywhere to work properly, you MUST boot into your preferred CFW FIRST (CBHC user don't need to worry about this as the patches are applied upon powering on your console).
- The concerned contents titleID. While really nothing should be in this folder unless its a failed, or incomplete install (which deleting won't cause any harm). I still recommend making sure that the titleIDs present in the folder we will access match content which you previously attempted to install. You can view the list of game, update, DLC etc. titleIDs here.
- The correct FTPiiU Everywhere release for you CFW variant. CBHC/Haxchi requires a specific version for example, Mocha CFW seems to be able to use that version too, but not the other way around. But just to be safe, I recommend using the one which is meant for your specific CFW. FTPiiU Everywhere for Mocha CFW, FTPiiU Everywhere for CBHC/Haxchi
- An FTP client. For people using Windows, you may use file explorer, but I recommend downloading a third party application such as WinSCP or Filezilla. Filezilla being available for MacOS and Linux as well. For this example I will be using WinSCP.
Preparing your console:
- First, turn on your console (with the USB storage device plugged in, if that is where you attempted to install the content which failed), next access the Homebrew Launcher using your preferred method
- Once in the Homebrew Launcher, boot into your preferred CFW (CBHC users can ignore this). After your console reboots and you reach the Wii U menu again, go back to the Homebrew Launcher and start the version of FTPiiU Everywhere that corresponds to your currently applied CFW.
- Once the application starts, take note of your Wii U's IP address presented to you on both the TV and Gamepad. Unless you assign your local addresses manually, this will change from time to time. So if for whatever reason you attempt this again at a later date, your consoles address will most likely have changed. At this point, you may leave your console be. You will not need to physically interact with it until we are finished.
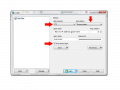
- Open your preferred FTP client application (I will be using WinSCP) and enter in the your Wii U's IP address (only change the port number if it is not already set to 21), select the correct protocol (plain old FTP), with no encryption and make sure to check off the "Anonymous login" box. Then click login.

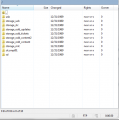
- Once you have successfully logged in, a list of directories like this should appear (make sure you are in the root (/) directory):

For content on the NAND:
For content which failed to install during installation to the system NAND, follow these steps:
- Start by following the path to this folder, from the root directory select: storage_mlc --> usr --> import.
- Once you reach the import folder, certain users will branch off to other directories depending on what type of content failed to install. The titleID database I linked to earlier in the article is a good resource for figuring out the correct folder to go into next (if you've had multiple types of failed installs). Different kinds of content have different ID's representing them. Since I am going to assume that the majority of people would have encountered a problem with full game installs, I will use them as an example. For instance, if Mario Kart 8 failed to install you'd see a folder within import called 00050000. This folder will be holding any full (eShop/retail) games which did not successfully install. Even though we will be deleting the folder holding the affecting content, I urge you to enter the folder anyway to make sure the game/s which failed to install have their titleIDs listed in there. Again, as an example the US release of Mario Kart 8 would have a titleID of: 1010EC00.
- Here I have provided a list of the titleID types which can appear in this folder:
00050002 eShop title demo / Kiosk Interactive Demo
0005000C eShop title DLC
0005000E eShop title update
Again, like I stated above. Once you have entered the correct parent folder for the type/s of content which failed to install and verified that the correct titleIDs are located within it. You may go back to the import folder, right click on once of the folders in the list above and delete the folder for titleID type containing said content. Depending on the total size of the game and when the failure occurred during installation, the process could take awhile. I strongly recommend waiting at your computer and watching the deletion process until it's done, as sometimes an error will occur. If so, simply dismiss it, and restart the process again. It most likely complete the second time around.
If the process complete without errors and upon refreshing the directory the folder which you deleted is no longer there, CONGRATULATIONS, you have followed all directions and successfully completed the tutorial. All you need to do is exit out of FTPiiU Everywhere by pressing the home button and then power off your console. Upon next boot up, check data management under system settings and you should see your reclaimed space.
For content on a USB storage device
For content which failed to install during installation to the external USB storage device, the steps required are nearly identical to those followed for the NAND process:
- Instead, follow this path from the root directory: storage_usb --> usr --> import. After you navigate to this directory, the same exact process from the NAND steps can be applied. So the following will be a copy & paste from above, but with a different titleID example.
- Once you reach the import folder, certain users will branch off to other directories depending on what type of content failed to install. The titleID database I linked to earlier in the article is a good resource for figuring out the correct folder to go into next (if you've had multiple types of failed installs). Different kinds of content have different ID's representing them. This time around I will use DLC content as an example. For instance, if Mario Kart 8's DLC failed to install you'd see a folder within import called 0005000C. This folder will be holding any DLC for games which did not successfully install. Even though we will be deleting the folder holding the affecting content, I urge you to enter the folder anyway to make sure the game/s DLC which failed to install have their titleIDs listed in there. Again, as an example the US release of Mario Kart 8's DLC would have a titleID of: 1010EC00 under the 0005000C folder.
- Here I have provided the la list of titleID types which can appear in this folder:
00050002 eShop title demo / Kiosk Interactive Demo
0005000C eShop title DLC
0005000E eShop title update
Again, like I stated above. Once you have entered the correct parent folder for the type/s of content which failed to install and verified that the correct titleIDs are located within it. You may go back to the import folder, right click on once of the folders in the list above and delete the folder for titleID type containing said content. Depending on the total size of the game and when the failure occurred during installation, the process of deleting content from a USB storage device should be fairly quicker than the same from the system NAND, but it still could take awhile. I strongly recommend waiting at your computer and watching the deletion process until it's done, as sometimes an error will occur. If so, simply dismiss it, and restart the process again. It most likely complete the second time around.
If the process complete without errors and upon refreshing the directory the folder which you deleted is no longer there, CONGRATULATIONS, you have followed all directions and successfully completed the tutorial. All you need to do is exit out of FTPiiU Everywhere by pressing the home button and then power off your console. Upon next boot up, check data management under system settings and you should see your reclaimed space.
The time for new tutorials in the Wii U section of the forums has come and gone, as by now most have moved along to the Switch homebrew scene, but this console is home to some astounding games, homebrew developments (lots of respect for those who developed the applications and exploits which made all this possible) and continues to remain very appealing to me and many others, never quite having it's full potential tapped into.
If you have suggestions for content to add, correct, change or remove please let me know. Thanks for reading.

Attachments
Last edited by Ron_Harrison,


